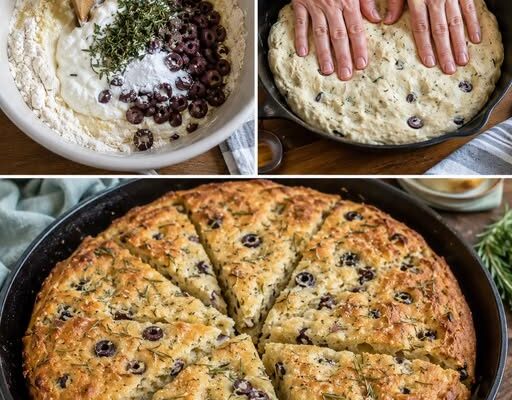

- Crisp-Edged Skillet Bread with Rosemary and Briny Olives: A Fast No-Yeast Recipe
- Why You Will Love This No-Yeast Skillet Bread
- What Makes This Bread Different?
- Ingredients You Will Need
- Choosing the Right Flour
- Baking Powder Instead of Yeast
- The Importance of Good Olives
- Fresh Rosemary Makes a Difference
- How to Prepare the Bread
- Step 1: Prepare the Skillet
- Step 2: Combine the Dry Ingredients
- Step 3: Add the Wet Ingredients
- Step 4: Fold in the Olives and Rosemary
- Step 5: Transfer to the Skillet
- Step 6: Cook Until Golden
- Step 7: Flip Carefully
- How to Get Extra-Crispy Edges
- Preheat the Skillet
- Use a Little Olive Oil
- Avoid Excessive Moisture
- Do Not Flip Too Early
- Use Moderate Heat
- How to Tell When the Bread Is Done
- Let It Rest Before Serving
- Flavor Variations
- Garlic and Rosemary
- Feta and Olives
- Parmesan and Rosemary
- Chili and Olives
- Sun-Dried Tomato and Herb
- Caramelized Onion
- A Mediterranean-Inspired Skillet Bread
- What to Serve With It
- With Soup
- With Salad
- With Cheese
- With Dips
- With Breakfast
- Turning It Into a Light Lunch
- Why Skillet Cooking Works So Well
- No Yeast Means Less Waiting
- Can You Prepare the Mixture Ahead?
- Storage Instructions
- How to Reheat It
- Can You Freeze It?
- Common Mistakes to Avoid
- Using Too Much Liquid
- Overmixing
- Burning the Bottom
- Using Too Many Olives
- Not Draining the Olives
- Cutting It Too Soon
- How to Make It More Rustic
- Adding Cheese to the Crust
- Making the Bread Softer
- Making It More Flavorful
- A Great Recipe for Beginners
- Frequently Asked Questions
- Can I make this bread without rosemary?
- Can I use only black olives?
- Can I combine green and black olives?
- Can I use dried rosemary?
- Can I add cheese?
- Can I make it gluten-free?
- Can I make it dairy-free?
- Why is the center undercooked?
- Why are the edges not crispy?
- Tips for the Best Skillet Bread
- An Easy Bread for Busy Days
- A Wonderful Addition to a Dinner Table
- How to Turn It Into an Appetizer
- Final Thoughts
Crisp-Edged Skillet Bread with Rosemary and Briny Olives: A Fast No-Yeast Recipe
There is something wonderfully satisfying about homemade bread, especially when it comes together quickly and fills the kitchen with the aroma of rosemary and warm olives. This crisp-edged skillet bread is a simple alternative to traditional yeast-based loaves, offering a golden exterior, a tender center, and plenty of savory character.
The best part is that you do not need to wait for dough to rise. There is no yeast, no lengthy proofing, and no complicated shaping. Instead, a simple batter or soft dough is cooked directly in a skillet, allowing the edges to become beautifully crisp while the center remains pleasantly tender.
Rosemary gives the bread a fragrant herbal quality, while briny olives add little bursts of salty flavor throughout. Together, these ingredients create a rustic bread that can be served with breakfast, lunch, dinner, or as a snack.
Whether you are looking for a quick homemade accompaniment to soup or simply want something warm and savory to enjoy with a little cheese, this skillet bread is an excellent recipe to keep handy.
Why You Will Love This No-Yeast Skillet Bread
Traditional homemade bread can be incredibly rewarding, but it often requires planning. Yeast needs time to activate, dough needs time to rise, and shaping and proofing can turn a simple craving into a several-hour project.
This recipe takes a different approach.
The absence of yeast means there is no rising period. Once the ingredients are combined, you can move almost directly to cooking.
The skillet also offers an advantage that a conventional loaf pan does not: direct contact with the hot cooking surface helps develop a deliciously crisp bottom and wonderfully browned edges.
Inside, the bread remains soft enough to tear apart with your hands or slice into wedges.
What Makes This Bread Different?
This is not intended to imitate a traditional yeast loaf.
Instead, it belongs to the family of quick breads that rely on other ingredients for structure and lift.
The result is rustic, flavorful, and uncomplicated.
The rosemary and olives provide most of the personality, while the basic dough or batter creates a neutral foundation that lets those ingredients shine.
It is particularly useful when you want freshly cooked bread without committing to a long baking process.
Ingredients You Will Need
The ingredient list is pleasantly simple.
For the basic bread, you will generally need:
- All-purpose flour
- Baking powder
- Salt
- Olive oil
- Milk, yogurt, buttermilk, or another suitable liquid
- Rosemary
- Green or black olives
- Black pepper
Depending on the version you prefer, you can also add:
- Garlic
- Grated Parmesan
- Feta cheese
- Dried oregano
- Chili flakes
- Fresh parsley
- Sun-dried tomatoes
- Sesame seeds
The exact quantities can be adjusted depending on the size of your skillet and the thickness of the bread you want.
Choosing the Right Flour
All-purpose flour is an excellent choice for a quick skillet bread.
It produces a tender texture while providing enough structure for the bread to hold together.
You can experiment with replacing part of the flour with whole-wheat flour for a heartier flavor.
However, using too much whole-wheat flour can make the bread denser, so a partial substitution is often the easiest place to start.
If using a gluten-free flour blend, choose one specifically formulated for baking, preferably one that contains a suitable blend of starches and flours.
The texture will naturally be somewhat different from a wheat-based version.
Baking Powder Instead of Yeast
The absence of yeast is what makes this recipe so convenient.
Baking powder acts as the leavening agent, helping create a lighter texture when the bread is heated.
Because baking powder begins working when it becomes hydrated and then reacts further with heat, it is best not to let the prepared mixture sit around unnecessarily.
Once your batter or dough is ready, move fairly promptly to cooking.
The Importance of Good Olives
Olives are one of the defining ingredients in this bread.
Green olives offer a bright, briny flavor, while black olives tend to have a softer, slightly richer character.
You can use one variety or combine several.
Before adding them, drain the olives thoroughly.
If they are extremely salty, rinse them briefly and pat them dry.
Chop them into small pieces so their flavor is distributed throughout the bread rather than concentrated in a few large sections.
Fresh Rosemary Makes a Difference
Rosemary has a powerful aroma, so a little can go a long way.
Fresh rosemary provides a particularly vibrant flavor.
Remove the leaves from the woody stem and chop them finely before adding them to the dough.
If fresh rosemary is unavailable, dried rosemary can be used.
Because dried herbs are more concentrated, use a smaller quantity.
You can also combine rosemary with oregano or thyme for a more complex herbal profile.
How to Prepare the Bread
Step 1: Prepare the Skillet
Choose a heavy skillet that distributes heat evenly.
Cast iron is particularly well suited to this recipe because it retains heat effectively and helps create a deeply browned exterior.
Lightly coat the skillet with olive oil.
Place it over moderate heat while you prepare the mixture, but do not allow it to become excessively hot.
Step 2: Combine the Dry Ingredients
In a large bowl, whisk together the flour, baking powder, salt, and black pepper.
Make sure the baking powder is evenly distributed.
If you are using dried herbs, they can be added at this stage.
Step 3: Add the Wet Ingredients
Pour in the milk or other chosen liquid.
Add olive oil.
Stir gently until a thick batter or soft dough forms, depending on the style of bread you are making.
Avoid overmixing.
The more aggressively you work the flour, the greater the chance of developing a tougher texture.
Step 4: Fold in the Olives and Rosemary
Add the chopped olives and rosemary.
Fold them through gently.
Try to distribute them evenly without overworking the mixture.
If using cheese, garlic, sun-dried tomatoes, or chili flakes, add them now.
Step 5: Transfer to the Skillet
Carefully place the mixture into the prepared skillet.
Spread it into an even layer.
The thickness will determine how quickly it cooks.
A thinner bread will become crispier, while a thicker one will have a softer, more substantial center.
Step 6: Cook Until Golden
Cook over moderate heat until the bottom develops a deep golden-brown crust.
Covering the skillet can help the center cook while the bottom browns.
The exact cooking time depends on the thickness of the bread and the heat level.
Keep the temperature moderate so the outside does not burn before the middle is cooked.
Step 7: Flip Carefully
When the underside is crisp and golden and the top is beginning to set, carefully flip the bread.
A large spatula can help.
If the bread is too large to flip easily, you can divide it into smaller portions or use a plate to assist with turning.
Continue cooking until the second side is also golden.
How to Get Extra-Crispy Edges
The crisp edges are one of the most appealing features of this recipe.
There are several ways to encourage them.
Preheat the Skillet
A properly heated skillet creates immediate contact between the dough and the cooking surface.
Use a Little Olive Oil
Olive oil helps conduct heat and promotes browning.
Avoid Excessive Moisture
If the dough is too wet, it may steam rather than crisp.
Do Not Flip Too Early
Allow the first side to develop a proper crust before attempting to turn the bread.
Use Moderate Heat
Very high heat can produce a burnt exterior and undercooked center.
Patience is still important, even with a fast recipe.
How to Tell When the Bread Is Done
The exterior should be golden brown and crisp.
The center should feel firm but not hard.
If you insert a thin skewer or toothpick into the thickest portion, it should come out without wet batter attached.
You can also gently press the center.
It should spring back slightly rather than feel liquid or doughy.
Let It Rest Before Serving
Once the bread is cooked, transfer it to a wire rack or cutting board.
Allow it to rest for several minutes.
This gives the interior time to finish setting.
Cutting it immediately can cause steam to escape rapidly and may make the center seem slightly gummy.
A short resting period also makes slicing easier.
Flavor Variations
The rosemary and olive combination is delicious, but there are plenty of ways to customize this bread.
Garlic and Rosemary
Add finely minced garlic to intensify the savory character.
Feta and Olives
Crumble feta into the mixture for a tangy, creamy contrast.
Parmesan and Rosemary
Grated Parmesan adds a nutty flavor and helps the crust brown beautifully.
Chili and Olives
Add red pepper flakes for a gentle kick.
Sun-Dried Tomato and Herb
Finely chopped sun-dried tomatoes pair wonderfully with olives and rosemary.
Caramelized Onion
Add finely chopped caramelized onions for a sweeter, deeper flavor.
A Mediterranean-Inspired Skillet Bread
Rosemary, olives, and olive oil naturally lend themselves to Mediterranean-style flavors.
For a Mediterranean variation, add:
- Green olives
- Black olives
- Rosemary
- Oregano
- Feta
- Garlic
- Sun-dried tomatoes
Serve the finished bread with a tomato salad, hummus, roasted vegetables, or a simple bean dish.
It makes an excellent addition to a casual Mediterranean-inspired meal.
What to Serve With It
This skillet bread is incredibly versatile.
With Soup
Serve warm wedges alongside tomato soup, lentil soup, vegetable soup, or creamy mushroom soup.
The crisp edges are excellent for dipping.
With Salad
A fresh green salad or tomato and cucumber salad creates a balanced meal.
With Cheese
Serve warm slices with soft cheese, feta, or another favorite variety.
With Dips
Try hummus, tzatziki, roasted pepper dip, or a simple herb yogurt sauce.
With Breakfast
Serve it alongside eggs, avocado, cottage cheese, or fresh vegetables.
Turning It Into a Light Lunch
A warm slice of this bread can become the foundation of an easy lunch.
Pair it with a large salad and a protein-rich topping such as beans, eggs, or cheese.
You can also cut the bread into wedges and serve it with a vegetable soup.
Because the olives and herbs already provide plenty of flavor, you do not need a complicated accompaniment.
Why Skillet Cooking Works So Well
Cooking bread directly in a skillet provides a unique texture.
The surface touching the pan receives concentrated heat, which encourages browning.
This creates a crust that can be difficult to achieve with some quick breads baked in deeper dishes.
At the same time, the covered skillet environment helps retain enough moisture for the center to cook without becoming excessively dry.
It is an especially useful method when you do not want to heat a large oven.
No Yeast Means Less Waiting
One of the biggest advantages is convenience.
There is no yeast to activate.
There is no first rise.
There is no second proof.
There is no need to knead the dough extensively.
The recipe can therefore fit into a busy morning or evening when you want something homemade but do not have hours available.
This does not mean the result is inferior. It simply has a different character from yeast-raised bread.
Can You Prepare the Mixture Ahead?
For the best result, it is better to prepare and cook the bread soon after combining the ingredients.
This is particularly important when using baking powder.
However, you can save time by preparing the individual components ahead.
Chop the olives.
Strip and chop the rosemary.
Measure the flour.
Prepare any additional vegetables or cheese.
Then combine everything shortly before cooking.
Storage Instructions
If you have leftovers, allow the bread to cool completely.
Store it in an airtight container at room temperature for a short period or refrigerate it if you need to keep it longer.
Because the bread contains moisture, refrigeration is preferable for longer storage.
The crust will soften over time, but reheating can restore some of the crispness.
How to Reheat It
A skillet is one of the best ways to reheat leftover slices.
Place them in a dry skillet over moderate heat and warm both sides.
You can add a tiny amount of olive oil if you want to refresh the crust.
An oven or toaster oven can also work well.
Microwaving is convenient, but it tends to soften the exterior.
If crispness matters, choose a dry skillet or oven instead.
Can You Freeze It?
Yes.
Allow the bread to cool completely.
Slice it into portions before freezing so you can remove only what you need.
Wrap the slices securely and place them in a freezer-safe container or bag.
Thaw them in the refrigerator or reheat them directly using a skillet or oven.
For the best texture after freezing, refresh the bread in a hot skillet for a few minutes.
Common Mistakes to Avoid
Using Too Much Liquid
A very wet mixture can result in a dense or soggy center.
Add liquid gradually.
Overmixing
Stir only until the ingredients are combined.
Burning the Bottom
If the skillet is too hot, the crust can brown before the interior has cooked.
Lower the heat if necessary.
Using Too Many Olives
Olives are flavorful and salty. Adding excessive amounts can overpower the bread.
Not Draining the Olives
Extra brine can change the consistency of the dough and make the final bread too salty.
Cutting It Too Soon
Allow a short resting period before slicing.
How to Make It More Rustic
There is no need to make this bread perfectly smooth.
A rustic appearance is part of its charm.
Leave the surface slightly uneven.
Allow some pieces of rosemary and olives to remain visible.
Create a few shallow indentations across the top before cooking.
Finish with a drizzle of olive oil and a few extra rosemary leaves after cooking.
Adding Cheese to the Crust
If you love a cheesy crust, sprinkle a small amount of grated Parmesan over the surface just before cooking or immediately before finishing the bread.
As it heats, the cheese can become golden and crisp.
You can also sprinkle a little cheese directly onto the skillet before adding the bread mixture.
This creates an especially savory crust.
Use caution with the heat because cheese can brown quickly.
Making the Bread Softer
If you prefer a softer texture rather than an especially crisp one, slightly increase the amount of dairy or use yogurt or buttermilk in the mixture.
You can also cook the bread covered for a little longer.
The lid traps moisture and helps the center remain tender.
However, remove the lid toward the end if you want the exterior to crisp again.
Making It More Flavorful
The simplest way to intensify the flavor is to build layers.
Use good olive oil.
Choose flavorful olives.
Add fresh rosemary.
Season the dough properly.
Brown the bread thoroughly.
You can also add roasted garlic, Parmesan, sun-dried tomatoes, or caramelized onions.
Remember that olives and cheese can already be salty, so taste carefully before adding additional salt.
A Great Recipe for Beginners
This skillet bread is particularly suitable for people who are new to homemade bread.
There is no complicated dough shaping.
There is no yeast fermentation to manage.
There is no need to understand how gluten development works in detail.
You simply mix the ingredients, place the mixture in a skillet, and cook it carefully.
It is an approachable way to experience the satisfaction of making bread at home.
Frequently Asked Questions
Can I make this bread without rosemary?
Yes. Try thyme, oregano, basil, parsley, or a combination of herbs.
Can I use only black olives?
Absolutely. Green olives are not required.
Can I combine green and black olives?
Yes. The combination provides a more complex flavor and attractive appearance.
Can I use dried rosemary?
Yes. Use less dried rosemary because its flavor is more concentrated.
Can I add cheese?
Definitely. Parmesan, feta, cheddar, or mozzarella can all work depending on the texture and flavor you want.
Can I make it gluten-free?
A suitable gluten-free baking blend can be used, although the texture will differ somewhat.
Can I make it dairy-free?
Yes. Use olive oil and a suitable plant-based liquid instead of dairy ingredients.
Why is the center undercooked?
The skillet may have been too hot, causing the outside to brown too quickly. Reduce the heat and cook for longer, especially if the bread is thick.
Why are the edges not crispy?
The pan may not have been sufficiently preheated, or the mixture may contain too much moisture.
Tips for the Best Skillet Bread
For reliable results, remember these simple tips:
- Measure the flour carefully.
- Add liquid gradually.
- Do not overmix.
- Drain the olives well.
- Chop the rosemary finely.
- Preheat the skillet.
- Use moderate heat.
- Avoid making the bread excessively thick.
- Give the first side enough time to brown.
- Flip carefully.
- Allow the bread to rest briefly.
- Serve warm for the best texture.
An Easy Bread for Busy Days
There are times when you want something homemade but simply do not have the time for an elaborate recipe.
That is where quick skillet bread shines.
You can prepare the ingredients while your skillet heats.
The bread cooks directly on the stovetop.
There is no need to wait for an oven to preheat for a long period, and there is no extended proofing process.
It is especially useful for last-minute meals or unexpected guests.
A Wonderful Addition to a Dinner Table
Imagine a warm skillet bread sitting beside a bowl of tomato soup.
The rosemary aroma fills the kitchen.
The olives provide little bursts of salty flavor.
The edges are crisp and golden.
The center is soft enough to absorb soup or sauce.
That is precisely the type of simple homemade food that can make an ordinary dinner feel special.
How to Turn It Into an Appetizer
For entertaining, cut the finished bread into small wedges or squares.
Arrange them on a serving board alongside:
- Hummus
- Whipped feta
- Olive tapenade
- Fresh vegetables
- Marinated peppers
- Herbed yogurt
The bread can be served warm or at room temperature.
Its savory flavor makes it particularly well suited to dips and spreads.
Final Thoughts
This crisp-edged skillet bread with rosemary and briny olives is proof that homemade bread does not always require yeast, hours of preparation, or complicated techniques.
With a handful of simple ingredients, you can create a rustic bread that has a golden, crisp exterior and a tender, flavorful center.
The combination of fragrant rosemary and salty olives gives every bite plenty of personality, while olive oil contributes richness and helps develop those irresistible browned edges.
It is ideal for busy mornings, quick lunches, relaxed dinners, or casual gatherings. Serve it beside soup, pair it with a fresh salad, dip it into hummus, or enjoy a warm slice with cheese.
You can also adapt the recipe endlessly. Add garlic, Parmesan, feta, sun-dried tomatoes, chili flakes, caramelized onions, or other herbs. Use green olives, black olives, or both.
The method remains wonderfully simple.
Mix, season, cook, flip, and enjoy.
And because there is no yeast involved, you do not have to plan ahead. When the craving for something warm and homemade strikes, this skillet bread can go from pantry staples to the table remarkably quickly.
Sometimes, the simplest recipes become the ones we make most often. This rustic rosemary and olive bread is exactly that kind of recipe: quick, flavorful, comforting, and wonderfully crisp around the edges.